How to create context based conversations with OpenAI and maintain conversation continuity
For the best chat experience with ChatGPT, you'll need to maintain the context of a user's conversation. This tutorial breaks down how to integrate with OpenAI, and how to converse with context

Hello fellow Bubblers,
In this article, we’re going to cover how to have context-based conversations with AI. The topic of maintaining continuity in a conversation with chatGPT is one that has come up multiple times (1,2,3 just to highlight a few) on OpenAI’s forum. The general response and reality (as of this writing) is that OpenAI/Chatgpt does not maintain the context of your conversations when you interact with the chat endpoint. This means that you need to maintain every bit of context of any conversation, and pass it to the model in order to ensure continuity.
For this tutorial, we’ll once again be using the OpenAI API, and specifically OpenAI’s chat endpoint. This article is a long form version of a session I taught this past week during Dev Day.
If you’re not yet subscribed to How to Bubble, please do so using the link below!
Chat endpoint vs. Assistant endpoint - which should you use?
As of this writing, there is another endpoint available (in beta)- the assistant endpoint - which you can also use to build custom functionality in your app. To explain the difference between the chat endpoint that we’ll be using, and the assistant endpoint, I will reference an explanation written by chatgpt:
The "Assistant" API is designed as a more specialized tool, often geared towards integrating AI capabilities into various applications, services, and products. It's like a Swiss Army knife, if you will; compact, versatile, and tailored for specific tasks. This API can be customized to perform a wide range of functions, from generating text based on prompts to answering queries, completing tasks, and even generating code. It's highly adaptable, making it a solid choice for businesses or developers looking to harness AI for particular use cases, especially where a more controlled, customizable integration is needed.
On the flip side, the "Chat" API, particularly the one you might associate with GPT-3 or its successors, is akin to having a conversational companion ready to discuss a broad spectrum of topics. It's designed to facilitate back-and-forth dialogues, mimicking human-like conversations. This API excels in engaging users with its wide-ranging knowledge and conversational abilities, making it ideal for applications requiring interactive communication, like chatbots for customer service, educational tools, or any platform aiming to provide a conversational user experience.
So the assistant endpoint may work well with: 'customized customer support tools, data analysis and reporting tools, and tutoring tools. The chat endpoint may work well with: conversational chatbots, general education tools, creative writing/brainstorming tools, and virtual companions (e.g. mental wellness apps).
In our scenario, given that we’re building a tool that is designed to offer more general conversations where users might ask broad questions and expect the AI to engage in a wide-randing dialogue, the chat endpoint is a better fit. It can handle a variety of queries and produce creative or insightful outputs based on the information given.
TL;DR - The assistant endpoint provides a more specialized experience, while the chat endpoint provides a more generalized experience.
Getting Started
One assumption that I will make as we get started is that you already have an OpenAI platform account and a unique key. If you’re unsure about how to get any of these, feel free to reference this earlier article:

Bubble database setup
We’ll start with the database. You’ll need to set this up in a manner similar to how one might set up a chat/messaging app. To do this, you’ll need to create the following data types:
Type: “Conversation”
Field: “Title”
Type: “Messages”
Field: “Content” - Type: Text
Field: “Conversation” - Type: Conversation
Field: “Role” - Type: Option Set (OS)
Type: "User” (built-in)
Field: “Tokens” - Type: Number
You’ll only need to create a single option set (OS) for the roles. Then create two options:
assistant
user
Note: ensure that the text within your option set is in lowercase.
Bubble.io API connector setup
The process of setting up the API connector is similar to what I outlined in my earlier article on connecting Bubble.io to OpenAI. However, I’ve summarized the process below as well:
Add an API in the API connector, and label it OpenAI. Leave the authentication as ‘None or self-handled’. Add two new shared headers, and label them as follows:
Key: Content-Type. Value: application/json
Key: Authorization Value: Bearer [Your secret key]
You should insert the secret key you got from OpenAI in the Authorization value input, and ensure that there is a space between the word ‘Bearer’ and your key.
Name your API call chat and change the ‘Use as’ dropdown to Action. This will allow us to access the API via workflows. Then, change the call from ‘Get’ to Post. In the input, paste the following text:
https://api.openai.com/v1/chat/completions
Further down in the large body input, you’ll need to input your json payload. It can include any information or question for purposes of initializing your call. Here’s an example of what I used:
{
    "model": "gpt-4-0125-preview",
    "messages": [
      {
        "role": "system",
        "content": "You are a helpful assistant."
      },
      {
        "role": "user",
        "content": "How many planets are there in the solar system?"
      }
    ]
 }
Ensure your json payload is all plain text and not dynamic. This will enable you to edit/customize the entire thing when it comes to building out your workflows. Using dynamic data in the API connector restricts the elements you can customize in the workflow tab to only the dynamic data you put in the API connector.
Building out the frontend
You will only need a few elements on your frontend:
A repeating group to display the chat messages,
A multiline input to allow a user to write out their prompts
A button to submit the contents
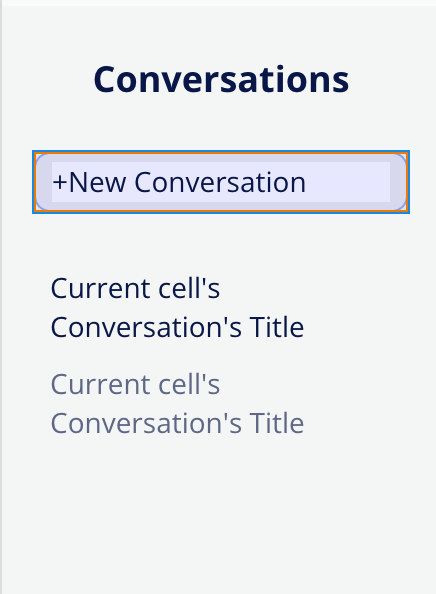
A sidebar (ideally a floating group) with a repeating group list of conversations.
This article does not focus on the design aspect too deeply, so take creative liberty. However, the following images show how you can connect your repeating groups to the data in your app:


Inside your messages repeating group, place a single text element, and connect it to the current cell’s chat messages content. In order to get the chat layout (i.e. messages from one party on one side, and from the other party on the opposite side of the repeating group), create a conditional on the text element that changes the layout of the text based on the role of the creator of the current cell’s message. When the role is assistant, the layout should be to the left. When the role is user the layout should be to the right.
See the example below:
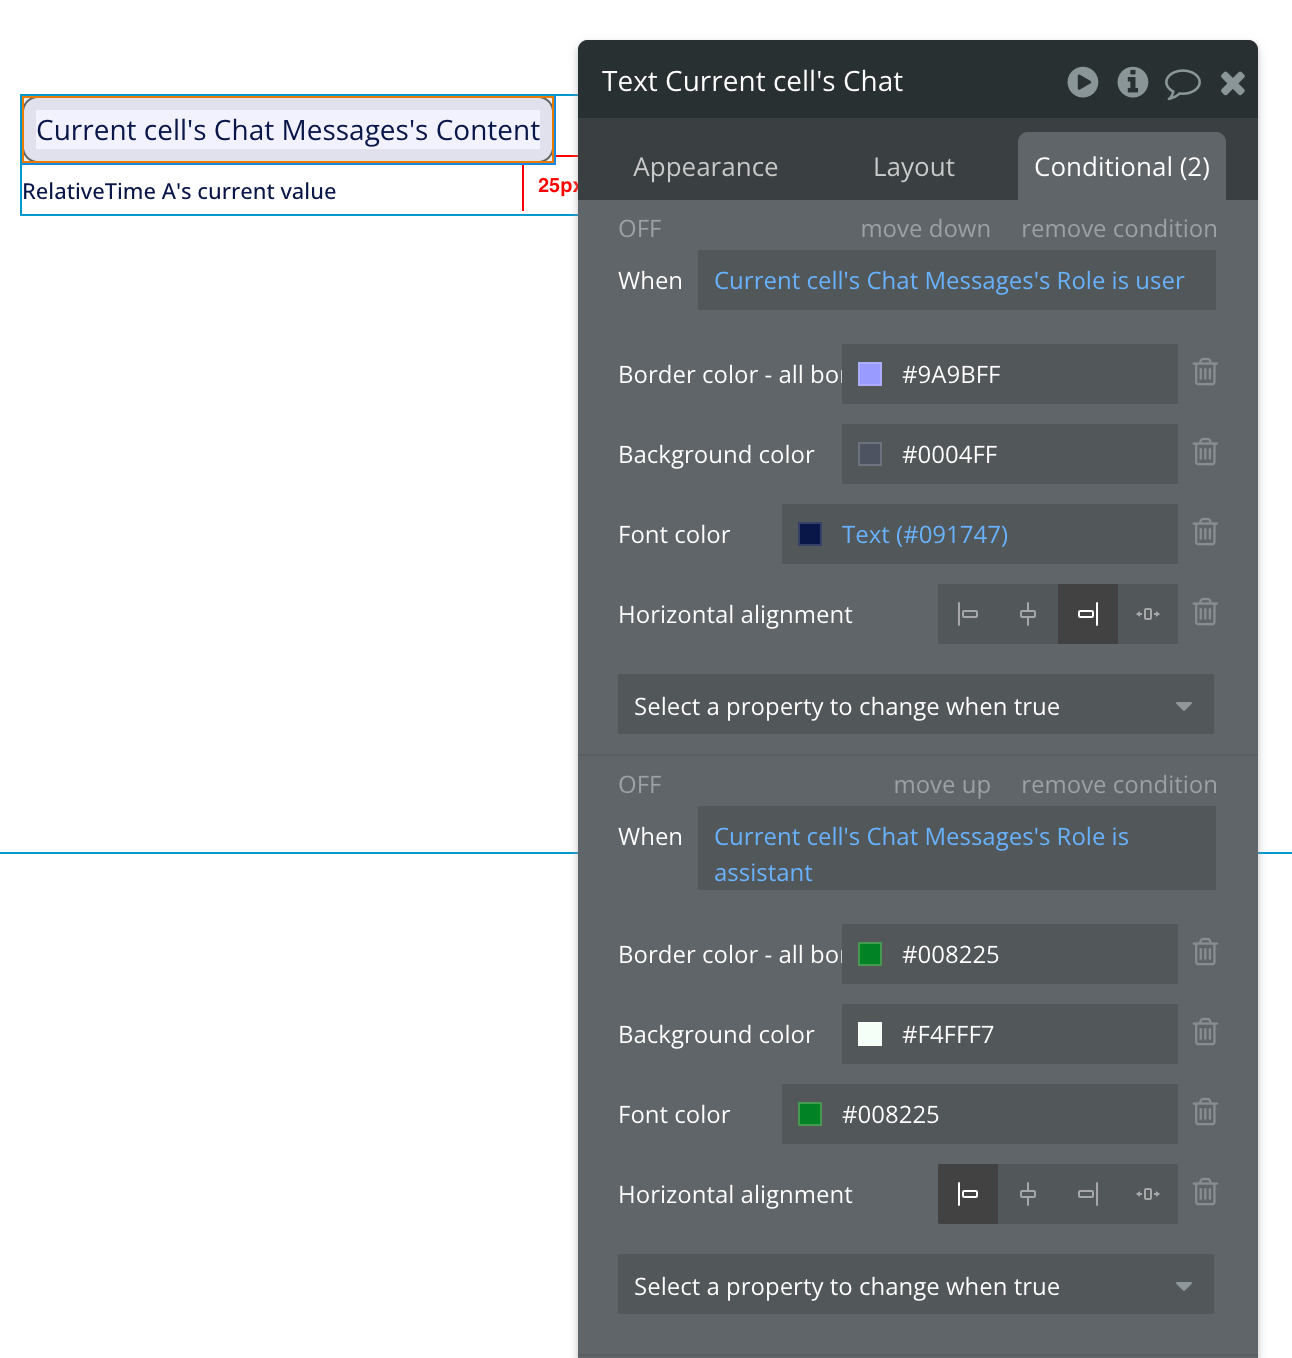
You can also add text to indicate the time a message was written. For this, I typically add the relative time plugin, which comes with an element that you place inside your repeating group. You need to link the element to the current cell message’s created date. Then you can set the time label text to reference the relative time plugin element.
Explaining how AI context conversations work in Bubble
Before we go into the workflows which will tie together our database, api and frontend work, we’ll need to first understand how the context conversations are created and used. To explain this, I’ve created a diagram, which you can feel free to save and reference anytime.

Since OpenAI does not maintain context of conversations by default, in order to have a context based conversation, you will need to send all the context (i.e. all your messages) to the API every time a prompt is created. What that means is that the list of text you’ll send will be longer and longer with each prompt. In order to do this, we’ll need add dynamic data referencing our messages data type into the json payload, and format it in a way that can be sent to the API.
Setting up the workflows
Workflow 1: Create Conversation when there is none
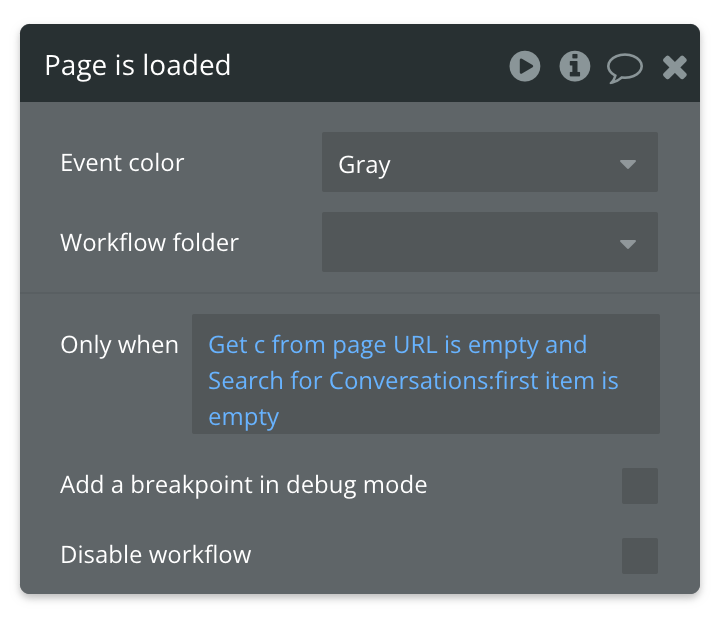
The first workflow we’ll build will be to set up our conversation. We’ll need to create a new conversation for users logging in to the app who don’t have any active conversations. To do this, we’ll use a page load event. In the only when constraint, we’ll state that this workflow should only be triggered when the url parameter “c” (conversation) is empty and no conversations by the current user can be found (i.e. search for conversations by current user, first item is empty). It should look as follows:
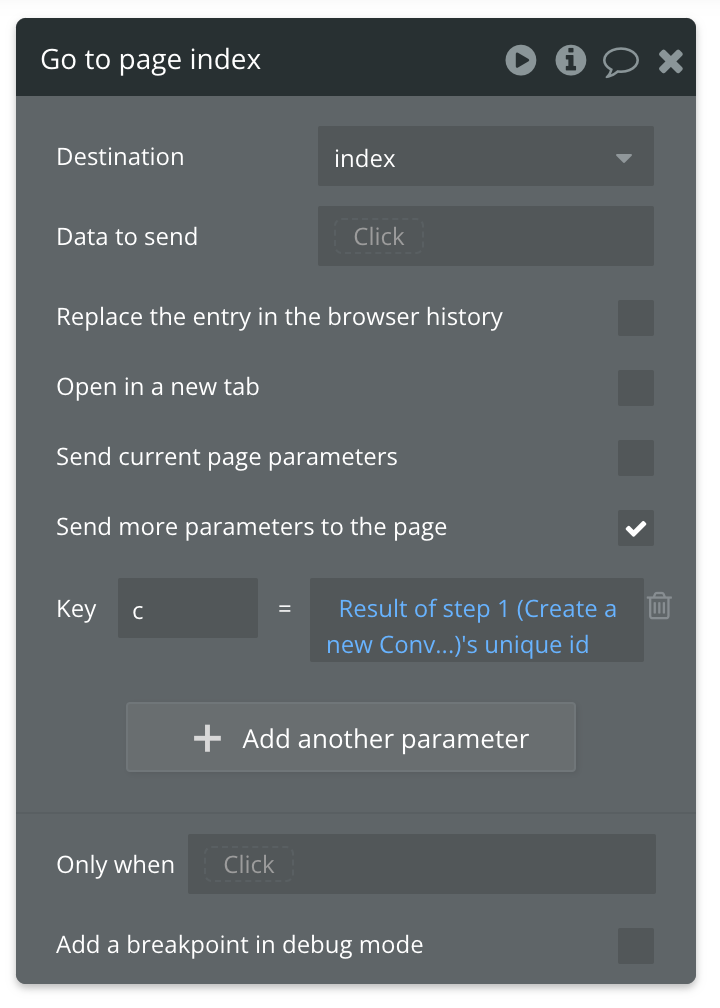
For the first action in this workflow, we’ll create a new conversation (create a new thing → conversation). Then with the next action, we’ll use ‘go to page’ to reopen this same page, but with the c url parameter set to the unique id of the conversation we just created (results of step 1)
Workflow 2: Display Conversation when one exists
This workflow can be created by copying and pasting the first workflow, but only changing the last part of the only when constraint to “is not empty”. This means that this workflow will be triggered when the current user has an existing conversation in the app (i.e. a returning user). In this scenario, the user won’t need a new conversation to be created - we’ll just load their existing one so they can continue.
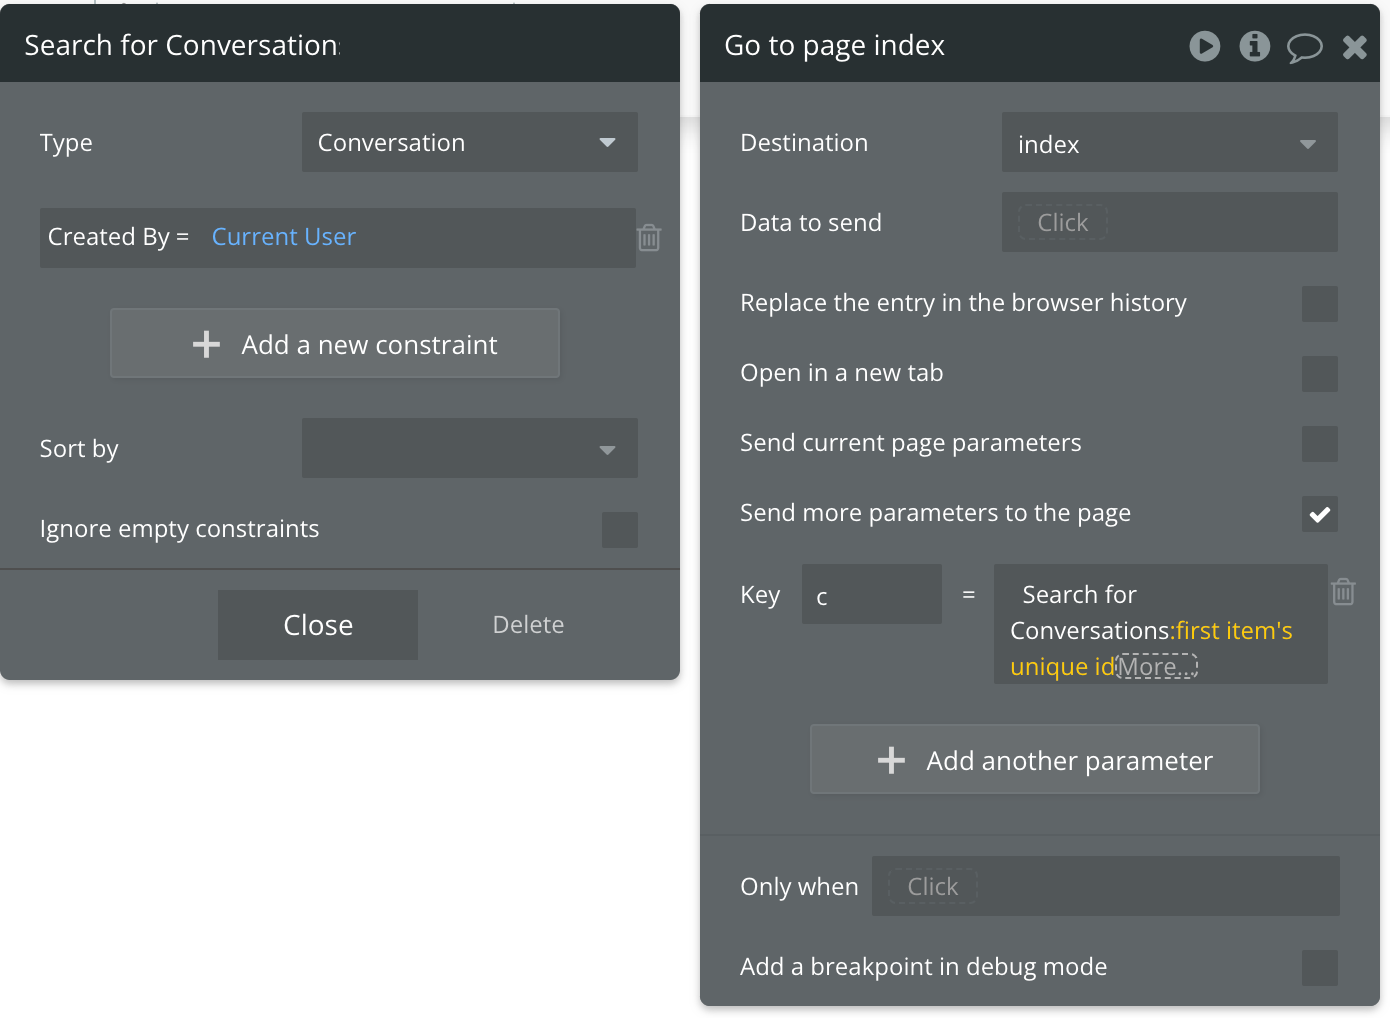
The only action in this workflow should be “go to page” to reopen the same page, but set the c parameter to be a search for conversations that have been created by the current user, and select the first item id:
Workflow 3: Sending data to the AI
This workflow should be triggered when the submit button is clicked. Select the button, then right click and select start/edit the workflow:
First action
In the first action, we’ll need to create a new thing - this thing will be a message. The fields should be populated as follows:
Content = Multiline Input’s value
Role = User
Conversation = Get c (Conversation) from url
Second action
This action will simply reset the relevant inputs.
Third action
The third action should scroll to the newly created message in the messages: repeating group. Use scroll to entry and set the entry to be repeating group messages list of messages: last item.
Fourth action
In this step we’ll send the data to the OpenAI chat endpoint using the setup we created in the API connector. As illustrated in the diagram above, you’ll need to add dynamic data to the json payload. To do this, remove the user prompt used in the initialization process, then add dynamic data. It should look as follows:
{
    "model": "gpt-4-0125-preview",
    "messages": [
      {
        "role": "system",
        "content": "You are a helpful assistant."
      },
      |YOUR DYNAMIC DATA GOES HERE|
      }
    ]
 }
Since we have a repeating group on the page that already references all the messages in this conversation, your dynamic data in this workflow can reference that repeating group’s list of chat messages.
The key in this step is formatting the dynamic data as text. This will allow you to format all the messages in your chat thread as json. In the Content to show per list item you will add the role of the message creator, and the content - each as dynamic data.
For the delimiter, you’ll only need to add a closing curl bracket and a comma. You should have something that looks like this:
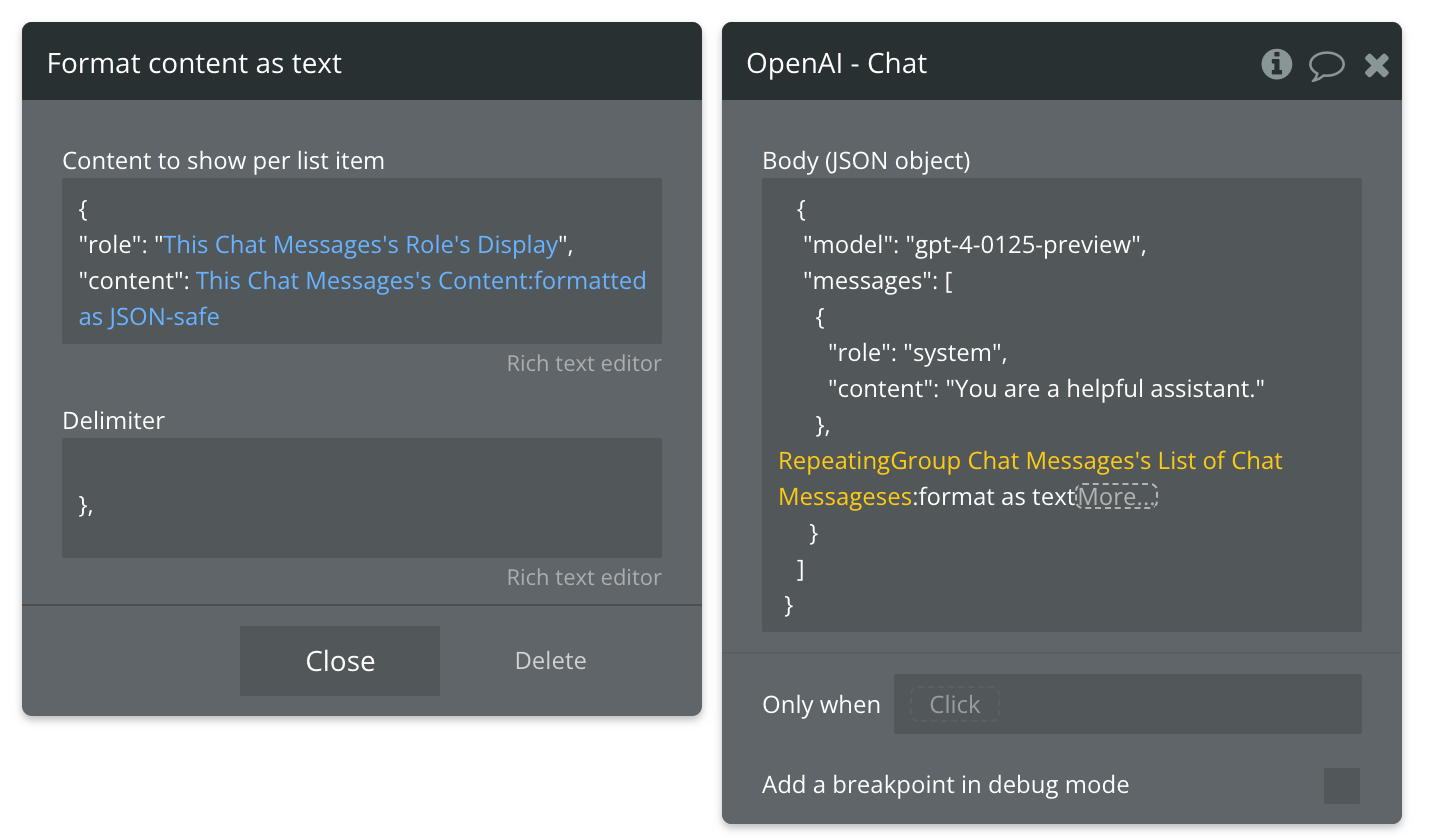
Note: to ensure that your setup is accurate, it’s easier to copy and paste the formatting from the other messages, then replace the relevant text with dynamic data. One risk of typing this out from scratch is you may ommit a character or two as you type (trust me I would know) and your action won’t work.
When adding the content, it’s important to append your dynamic data with “formatted as json safe”. This is because your user may type characters in their prompt that don’t work with json. These characters need to be escaped (meaning specially formatted for a json payload) so that it can work. When you use this function, you do not need to include the ““ on either side of the content, because this function automatically adds those in for you. As the image above shows, the role has these speechmarks, but the json safe content does not. Always keep this in mind.
Fifth action
Next you’ll need to create another message using ‘create a new thing’. The conversation should still reference the “c” url parameter, but the role should now be set to assistant and the content should reference the results of step 4 - which is the AI action we just created. To retrieve the response, you need to select the results of step 4 → choices → each item’s message content. It should look as follows:

Last action
This last action is optional, but it involves creating a custom event. This action will automatically change the label of the conversation based on the first prompt that your user creates in the thread - just like how openai renames your conversation threads based on the first topic you discuss.
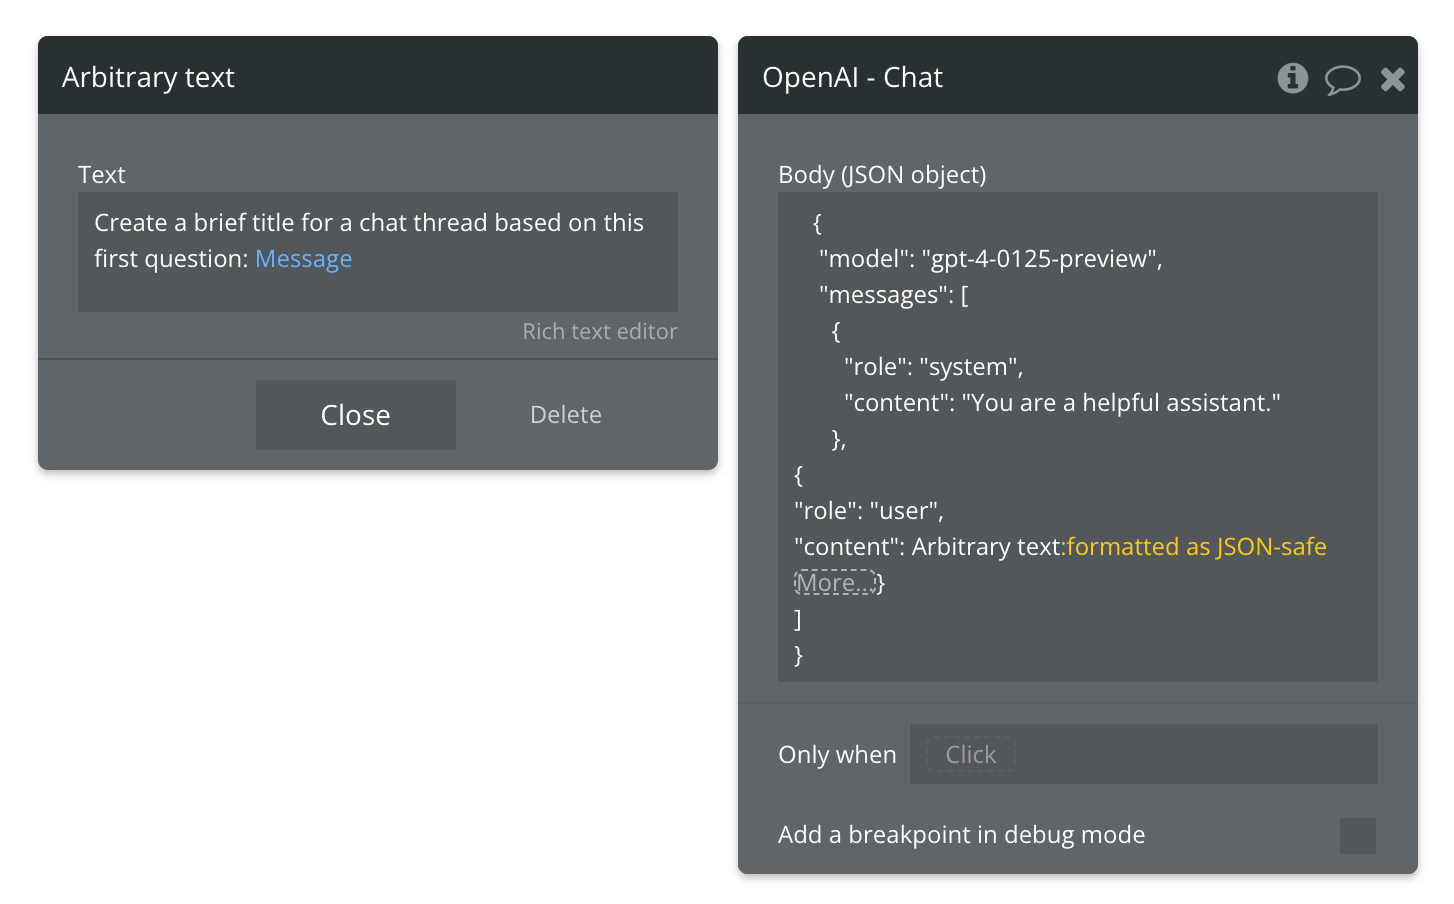
To do this, create a custom event and add a text parameter (which we’ll use for the message) and a parameter for the conversation, which you can send by referencing the “c” in the url. In the first action, add another OpenAI call, and add dynamic text for the second message in the payload. I use arbitrary text for this, since I want to reference the message text, and also include my own description/parameter for what I want the AI to do. Then I format the entire thing as json safe. It should look as follows:
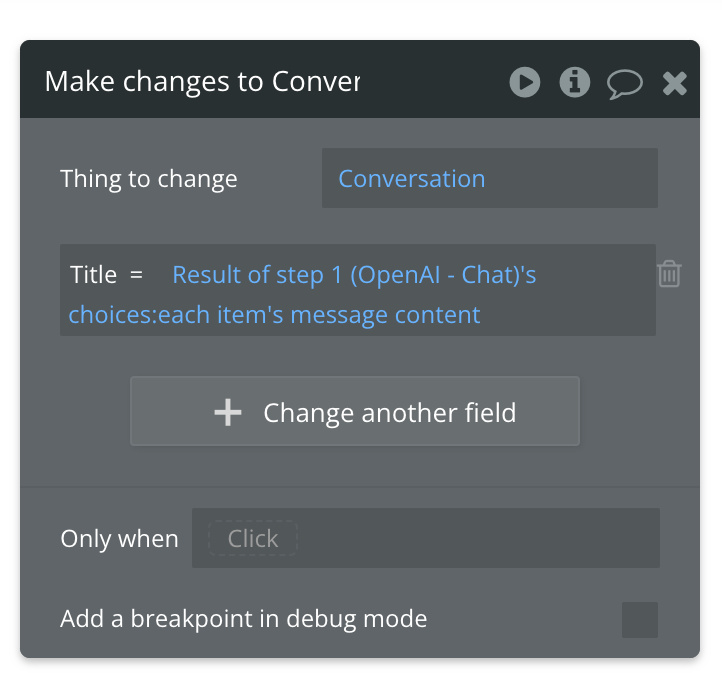
In the second action of this custom event, make changes to the conversation, and reference the conversation in the custom event. Change the title of the conversation to: results of step 1 → choices → each item’s message content.
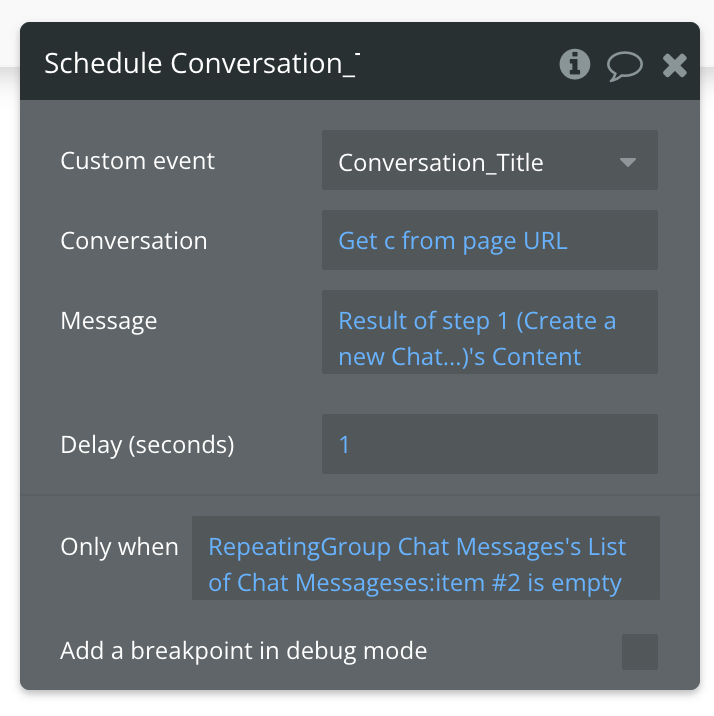
Finally, return to the workflow linked to the submit button, and schedule the custom event you just created to trigger on the condition that the repeating group’s second item is empty. What this ensures is that this workflow is only triggered when the user has typed and submitted their first question or prompt in the input.
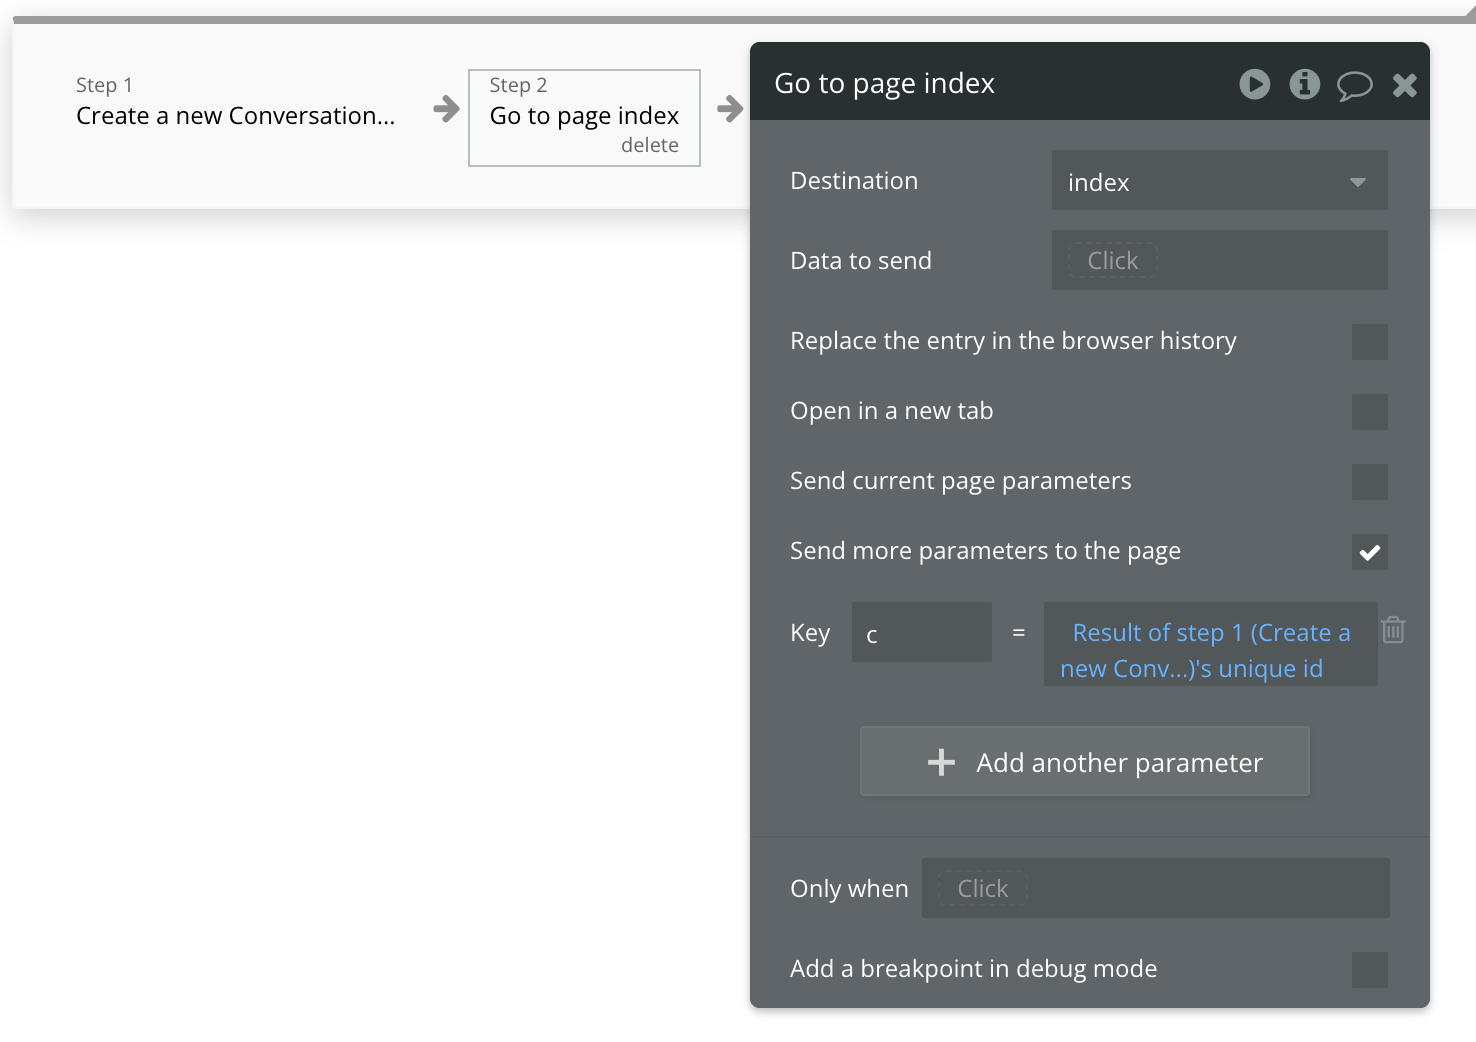
Workflow 4: Creating a new conversation
Since a user may want to have multiple conversations with the AI on different topics, we’ll add a workflow linked to a button in the sidebar. This workflow is similar to the page load workflows, and only includes 2 steps. In the first step, a new conversation is created, and in the second step, the ‘go to page’ is triggered, and the new conversation is referenced in the “c” parameter.
And that’s it! You’ve now created an AI app that can have context-based conversations. This means that anything a user mentions in a conversation can be referenced by the AI in the conversation. Here’s a demo of this in action:
Important things to note
On tokens
In a user-facing app, it’s important to track the number of tokens your user uses. You can do this by setting up a token number tied to your user data type, and deducting tokens every time the user interacts with the AI. This way you can minimize users using your app and tokens freely in an unlimited way (since you will be paying for connecting to the API, this would be bad for you). You can set up subscription plans that are tied to a token count, and update your users tokens when they subscribe to a plan.
Optimize your experience with backend workflows, custom events, and more.
This tutorial covered the process of creating a context-based conversations that have continuity. However, it was a quick and simple walkthrough of the process. There are definitely ways of optimizing the process/app (e.g. using backend workflows for example). You should consider ways of optimizing when building your own app. This tutorial only covers the basics of how everything works.
Not all context is always necessary
Conversations can get very long. Since we have to maintain the context, this can result in long json payloads being sent the more messages a person creates. As a result, you may hit a context limit for the AI model you’re using. One workaround for this is to send less and less context when your context is getting too long. It’s likely that the very first thing a user submits may not relate the the 100th thing they submit. So you can truncate the context sent to the most recent messages. It’s important to consider your app’s use case though, to know if this solution would work for you.
Alternatively, if you have to send a lot of data (e.g. if you’re sending long documents that you want the AI to reference), you can consider sending summaries instead of long-form original content.
Also keep in mind that the longer the conversation, the more tokens are used - because more context is sent each time.
I hope you found this tutorial helpful. If you did, please share it so other bubblers can use it and learn too! It also helps this newsletter out a lot!
Happy Bubbling!
Shiku