How to build Chat functionality (Part 02)

Hello fellow Bubbler!
Welcome to Part 2 of building chat-functionality on Bubble! If you haven’t already seen the first part of this process, you can check out the full article using the link below:
In the last issue, we covered the design aspect of building chat into Bubble. In this issue, we’ll be focusing mainly on creating workflows that enable these elements to work.
Finding users to chat
Finding users to chat with is a process that can vary depending on the application you are building. For example, you may be building an application with different user types, where only people in one group can chat with each other. Or you may be building an application where people need to be connected to each other first before a chat can be initiated. These are features that would be built into the workflow and conditionals of your chat.
For this example, we’re going to create a repeating group list that shows all the users on the platform, so anyone on the platform can chat with anyone else. To do this, we’ll need to add a repeating group that will display all the users on the platform.
The first step is to hide the repeating group we previously created that displays the Chat list on the left side of the chat section. You can do this by going to the elements tree and clicking on the hide icon for that repeating group. In its place, add a new repeating group. This repeating group will display all the users on the platform. Set the user type of the repeating group to User and the data source to ‘search for users’ (with no constraints).

Next, format the repeating group to ‘vertical scrolling’, and lastly, uncheck the ‘This element is visible on page load’ box, since the visibility of this element should be triggered by an action. The chat group that was hidden at the start of this process is the element that will be visible by default. You should end up with something like this for your new repeating group:

In the first cell of the repeating group, you’ll need to add two elements: a text element and a button. The text element will display the name of the user, and the button will be a trigger to start a chat with that user.
For the text element, set the dynamic text to display the ‘Current Cell’s User’s Username’. This means the repeating group will display a list of usernames - all the usernames of people on the app.

Finally, format the button to say ‘Message’. By clicking on the Message button, the active user will initiate a chat with the selected user from the repeating group. You should end up with something like this:

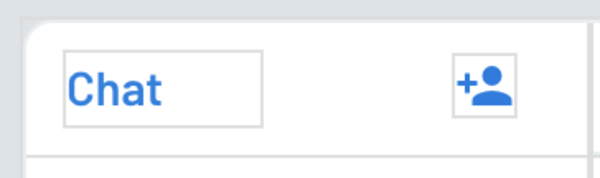
In order to alternate between the repeating group list of users on the sidebar, and the repeating group list of chats, you’ll need to add an icon/button to trigger a workflow that will alternate between the two. To do this, I created an icon that I put next to the ‘Chat’ text label. In this example, I used a ‘material icon’ under the visual elements tab, and selected the icon with a user and a ‘+’ to demonstrate that a user is adding a new chat with a new user.
Workflows
Workflows
The workflow to alternate between the chat list and the user list will be linked to the icon. To create this, right-click the icon and ‘Start/Edit Workflow’.
The first action will be to ‘hide’ the ‘Repeating Group Chat’, which is the repeating group that is displayed on page load. Select Add an Action, then ‘Elements’, then ‘Hide’. Here you’ll specify the repeating group element that should be hidden, which in this case is labeled as ‘Repeating Group Chat’.
The next action will be to show the repeating group that lists Users. The ‘show’ action is found in the same place as the ‘hide’ action we just used. In this step, you’ll specify that the repeating group for the users should be shown.
The final workflow should look like this:

Selecting Users to Chat
In order to open a chat with a user, we’ll need to create a workflow that will be triggered when the message button is clicked. To create this, right-click on the ‘Message’ button, then ‘Start/Edit workflow’.
In the new workflow, the first action will be to Create a New Thing. Under type, select ‘Chat’, then add two fields. In the first field, input Users then add, then Current cell’s user. In the following field, input Users, then add, then Current user.

What this does is create a new chat between the user selected from the User list (indicated by the first field), and the current active user (indicated by the second field).
In the same window, under the ‘Only when’ section, we’ll add a condition that indicates that this chat should only be created if there isn’t already an existing chat between the current user and the selected user. To do this, add dynamic text that does a Search for Chats, with constraints for the current user and the selected user. Your constraints should look as follows:

The final part of the dynamic text should include first item and is empty. Running a search in Bubble always returns a list, and even if that list contains one item, Bubble still registers the search result as a list. This latter part of the dynamic text specifies that it should look for only a single item on that list. So even though the result of this search is technically one result, you need to specify that Bubble should read it as a single item, not a list containing a single item. That’s what the ‘first item’ part of the dynamic text specifies. The subsequent dynamic text - ‘is empty’ - specifies that the condition should be applied if the search turns up with no results.
Altogether, this action states that a new chat should be created between the current user and the active user, only if Bubble can search the database and find no existing chat between these two users. If there is an existing chat, the workflow will not run, which will prevent users from creating duplicate chats with the same user pairing.
The next two actions in the workflow sequence should be to hide the repeating group containing the user list (in a similar fashion as described earlier), then show the repeating group with the chat list.
Finally, the last action in this workflow will be to display the new chat in the chat group on the right. To do this, select Add an Action, then Element actions, then Display Data (under Group, not under Repeating group!). The specific group you’ll need to find is the Chat group. The data you’ll need to display is Results of Step 1, which was the step in which the chat was created. This will display the chat in the chat group, but without any messages(since it’s a new chat). Users will then be able to add messages to the new chat.

Sending a Message
To enable a user to send a message, we’ll need to create a workflow that is linked to the ‘Send’ button in the Chat interface. To get started, right-click the send button, then select start/edit workflow.
In the workflow tab, a new workflow will be generated that is connected to the button. However, there won’t be any actions or steps in the workflow. We’ll start by adding a step to create a new message by selecting ‘click here to add an action’, navigating to ‘data’, then ‘create a new thing’, as illustrated below:

Since the new thing we are creating is a message, under the Type tab in the pop-up window, we’ll select ‘Message’. You can then add fields manually by clicking the ‘add field’ button, or to save time, click on the ‘Add all fields’ text. This is going to populate the window with all the fields from our ‘Message’ data type in our database. Specifically, there should be three options that show up: Message Chat, Message Content, and Message Read, which are fields we created in the last tutorial.
Under the ‘Message Chat’ option, input ‘Parent group’s Chat’. This is because the message that the user creates has to be associated with a specific chat. If User A is chatting with User B, that’s one chat. If User A is also chatting with User C, that’s another separate chat. Each created message should be linked to the appropriate chat, which is determined by the chat selected in the chat list.
Next, under the Message Content option, select your chat input, then select ‘value’. This step takes the information that a user types into the input in the chat, and stores it in the database as a message.
Finally, under the Message Read option, select ‘No’. This is because by default any new messages that are sent by a user are unread by the recipient until the message is opened.
You should end up with something like this:

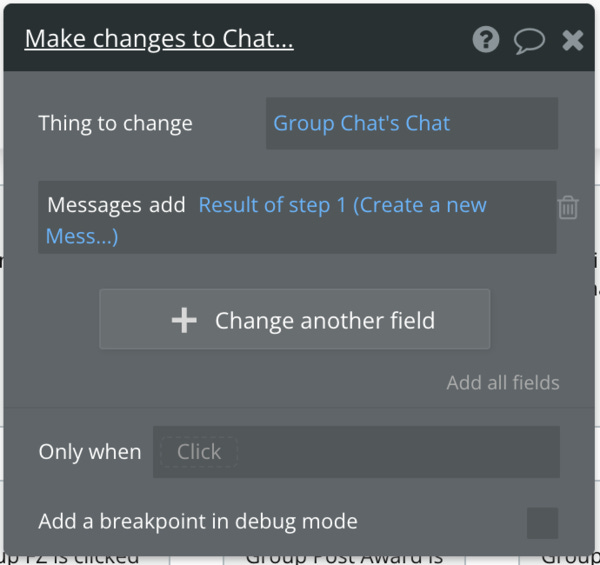
Next, we’ll add a new action by following the same steps as the first action, but this time we’ll ‘make changes to a thing’. In this case, the thing we’ll change is the Group Chat’s “Chat”. In our database, the Chat contains a list of messages and a list of users. We’ll be making changes to the list of Messages, by adding the newly generated message to the list. This step is what enables the new message to display in the chat interface that we designed, since the interface references the list of messages in a chat.
To do this, select ‘change another field’ in the popup window, then input Messages, click add, and then select Results of step one. Step one refers to the first action we created. This first action created the message, so the current action will add it to the chat.
You should now have something that looks like this:
Finally, we’ll add two more actions. One to reset the chat input field, and another to scroll to the latest message.
To reset the input, select add an action, element actions, then reset inputs. That will clear the text that the user wrote in the input field after the message has been created.
To scroll to the latest message, select add an action, then ‘scroll to. In the popup window, select Repeating Group Message Content. This references the repeating group created earlier (in the previous issue of this newsletter series), where all the messages are displayed. Under 'entry to scroll to’, select Results of step 1. This references the most recent message that was created. It’s important to complete this step since, without it, the message popup would load to the top of the repeating group, which contains the oldest messages. This would be improper from a UX perspective since every time you open a chat message, you should see the most recent messages first, with the option to scroll up to view older messages.
Your workflow for creating a new message and dislaying it in the messages group is now complete and should look like this:

You’ve now successfully created a chat section that can search for users to chat with, create new chats, and add messages to the chat.
Navigating between Chats
The final step in this process will be to enable users to navigate between chats in the Chat list. To do this, you’ll need to hide the Repeating Group for the user list in the elements tree and show the Repeating group for the chat list.
Since this section doesn’t contain a button, we’ll want to create a function that allows the user to click on any cell in the list and reveal the chat that’s been clicked on The trick to achieve this is by creating a mask/overlay group. This is a transparent group that is placed on top of all the elements in the cell of the repeating group. This overlay will have a workflow linked to it that will change which chat is displayed.
To do this, first add a group into the cell and label it ‘overlay’. Make sure that the group you’ve added spans the entire width and height of the cell.

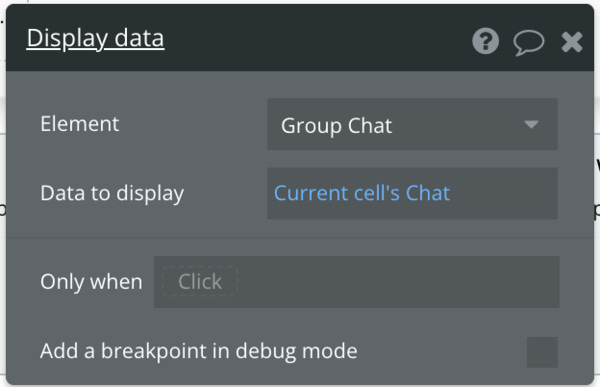
Next, right-click the group and start a workflow. In this workflow, the first action will be to ‘display data’. You’ll find this by navigating to ‘element actions’ then ‘display data’ (under Groups).

The element that should display the data is the Group Chat (on section on the right side of the chat), and the data to display will be Current cell’s chat.
The next action will be to scroll to the latest entry, which can be done in the same way as earlier.
The last action will be to make changes to the message. In this step we’ll set the ‘Message Read’ status to ‘yes’. So when the message is opened, it will be registered as read.

To do this, first ‘make changes to a thing’, then input the dynamic data: Current cell’s Chat Messages: last item. This will mark the most recent message in the chat list as read. This action becomes really useful if you want to create custom states that specify the difference between read/unread messages. For example, you could specify that any message that is unread should be formatted in bold, or should have a background color, to indicate to the recipient that they have an unread message in their list. When the message is read, the state of the text/background could revert to normal.
And that’s it! This covers the workflow part of building chat functionality in Bubble. I hope you found this helpful! If you found yourself stuck or confused in any way, feel free to send me a message and I’ll try my best to clarify and post an update to this newsletter issue.
Also, in the spirit of building and learning in public, if you find any issues, errors, or inefficiencies in any of the processes shown, send me an email with a detailed explanation, and I will make note of the correction in the subsequent newsletter (and I’ll give full credit to you!).
Happy Bubbling!
Shiku
Hi Shiku, when you change the Message Read field of the last message in the chat to 'Yes', doesn't that mean the Message Read of all the other messages in the chart remain unread, as in Message Read for those messages remain "No"?