
How to build chat functionality (Part 01)
How to build chat functionality (Part 01)

Hello fellow Bubbler!
I want to first thank all of you for subscribing to my newsletter.! If you’re new, welcome! We’re now over 100 Bubblers strong! I hope you can get a lot of value out of the content I write.
In the last issue, I covered how to build multi-level comments in Bubble.
Shoutout to Olivier Coolen, a subscriber to How to Bubble, who pointed out a correction in my last issue: it is in fact possible to display a full list of content in a repeating group by selecting the checkbox that says ‘load all items immediately’ in the new responsive engine.
If you are wondering what this is in reference to, check out my last issue where I covered how to build multi-level comments in Bubble, linked below.
Another point of note on the above article: the new responsive engine has since evolved to include options like ‘collapse when hidden’ on all elements including repeating groups. This drastically simplifies the process of building a commenting system.
If you have any comments or suggestions regarding the content of this newsletter, feel free to send me an email. I’ll be sure to make changes and give you credit when you do :)
This Week on Twitter
Yesterday, I launched a new app clone called LinkedOut. This Linkedin clone is built in Bubble and is designed for desktop viewing only. Check out my thread on why I built it, and click the link below to view the app if you haven’t already :)
In this issue, I’ll go over how I built a chat feature into my Bubble app. I’ll go into as much detail as I can so you can follow along and replicate the process. Because of the level of detail included, I’ve decided to break the process up into different parts, to make it easier to go through and to prevent this newsletter from being overwhelmingly long. Each part will be published in two different newsletters.
I hope you enjoy it and learn a thing or two :)
Building Chat functionality in Bubble (Part 01)
In Part 1, I’m going to show you how to:
Minimize/maximize a chat section
Structure the data for the chat
Create the chat interface
I’ll be using Reggit as an illustration.
Minimizing and Maximizing the chat
Some websites/web apps have a chat tab that floats at the bottom of the screen. You can see an example of this on Twitter’s desktop view. You can also see it in Reggit. As you scroll the site, the tab remains in the same position of the screen, and when you click on it, it expands to reveal the chat section.
To achieve this in Bubble you’ll need to use a floating group. Floating groups aren’t contained by the page. Instead, they float on top of all the page elements.
To get started, you’ll need to create two floating groups. The first will be the minimized version of your chat, and the second will be the expanded version of your chat. You can label one ‘small’ and one ‘large’, or ‘minimized’ and ‘maximized’ - whatever nomenclature will help you distinguish between the two. I will be referring to each as ‘minimized’ and ‘maximized’ throughout this issue.
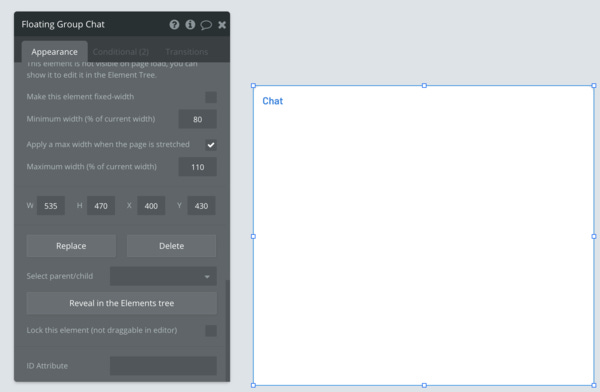
Place the first floating group at the bottom of your page. It’s important that you perfectly align the bottom of the floating group with the bottom of your page. In this example, my page height is 900px. My minimized chat tab is positioned 860px from the top of the page as shown by the ‘y’ measurement. The height of the group itself is 40px. When you add both the 860 and the 40px, you get 900px. That means that the bottom of the floating group is perfectly aligned to the bottom of the page. And when the page scrolls, it’ll remain in the same place.

You can design the height and width of the tab according to your preferences, as long as it remains aligned to the bottom.
Once you’ve created the minimized floating group, hide it in the elements tree, and create another tab for the maximized chat. Again, the dimensions of these are up to you. What is important in this case is that you align the floating group to the bottom of the page as before, and make sure that the margin (which is the distance between the floating group and the edge of the page), is the same for both floating groups. In this example, both floating groups have a right margin of 25px, which means the distance between the right edge of the floating groups and the right side of the page is 25px.
Another important point to add about the maximized floating group is that you must uncheck the box that says this element is visible on page load. This is because the minimized floating group is what should be visible by default, and the larger group should only become visible when triggered.
The next step is to create the trigger that will hide one floating group, and show the other (and vice versa).
To do this, right-click on the minimized floating group and select ‘start/edit workflow’. This will take you to the workflow tab and initiate a workflow for the floating group. The workflow will eventually include multiple steps (many of which will be added later), but to start with, add an action to hide, and an action to show.
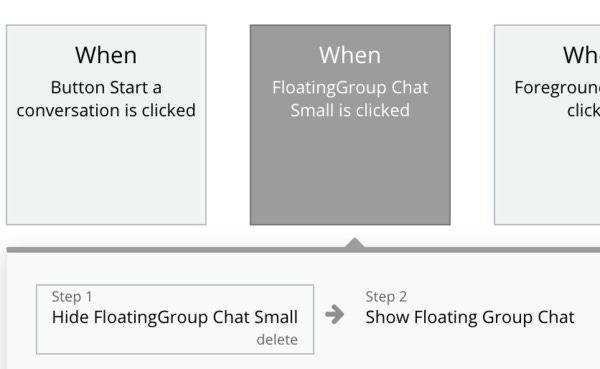
With the ‘hide’ action you will hide the minimized floating tab, and with the ‘show’ action, you will show the maximized floating tab. Once you’ve done that, you will repeat the same process for the maxmized chat, only in this case you’ll hide the maximized chat and show the minimized chat, when the maximized chat floating group is clicked. Alternatively you can add an icon, or a ‘close’ link inside the maximized chat group, and connect the workflow to that.
Once you’ve completed these steps, you’ll have a chat section that is minimized and maximized when a user clicks on each group
Structuring data for the chat
The data structure of the chat section is relatively simple. You’ll only need two data types.
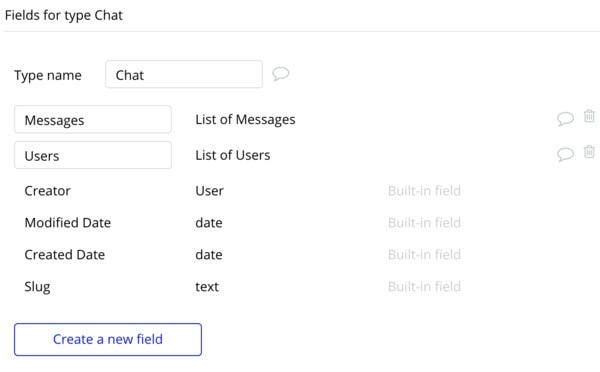
In the Data tab in Bubble, create a new data type called ‘Chat’, and another data type called ‘Messages’.
In the ‘Messages’ data type, you’ll need to create three fields. Label the first field ‘Message Content’ and make the field type ‘text’. This will be for the text that users write inside the chat.
The second field can be labeled ‘Message Chat’, and the field type for this field will be ‘Chat’ which is the first data type we created. This will be used to link the text threads to a specific chat between two users.
The third field can be labeled ‘Read’ and is a ‘yes/no’ field type. This will be used to determine whether a message has been read or not. Set the default for this to ‘no’ since by default, any new messages that are sent are unread by the receiving party.
Your data structure for the ‘Message’ data type should now look like this:

For the ‘Chat’ data type, you’ll only need two fields. The first field you create can be labeled ‘Messages’ and the data type will be ‘Messages’ (which is the data type we just finished creating). When creating this field, be sure to click the checkbox that says ‘this field is a list (multiple entries)’. This will include all the messages that are within a particular chat.
The second data field can be labeled ‘Users’, and the type set to ‘User’. Be sure to click the checkbox that says ‘this field is a list (multiple entries)’. This will list the users within a particular chat.
Your data structure for the ‘Chat’ data type should now look like this:
Bonus: While I mentioned earlier that you will only need two data types, you would also benefit from making a few minor modifications to your ‘User’ type. The User data type is a default data type that comes in Bubble. For the purposes of the chat you’ll need to add a few fields to the User:
Field Name: Username - Field type: Text
Field Name: User-Profile-Pic - Field type: image
If you’re working on an existing app in which you are integrating the chat feature, then these fields may already exist in your User Data type.
Creating the Chat interface
Once your data structure is done, you can return to the designer to create the chat interface.
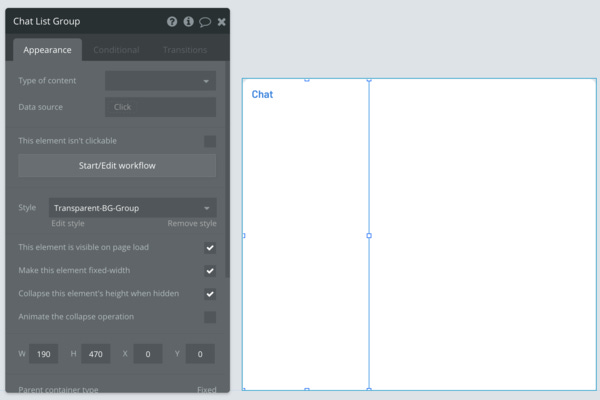
Within the maximized floating group, you’ll need to create two regular groups. The first group, positioned on the left side of the floating group, is for the list of chats (the list of conversations that a user is engaged in). The group on the right side will contain the messages.
You can use your preferred labeling nomenclature for each group. In this example, I labeled the left group ‘Chat List’ and the right ‘Chat Messages’.
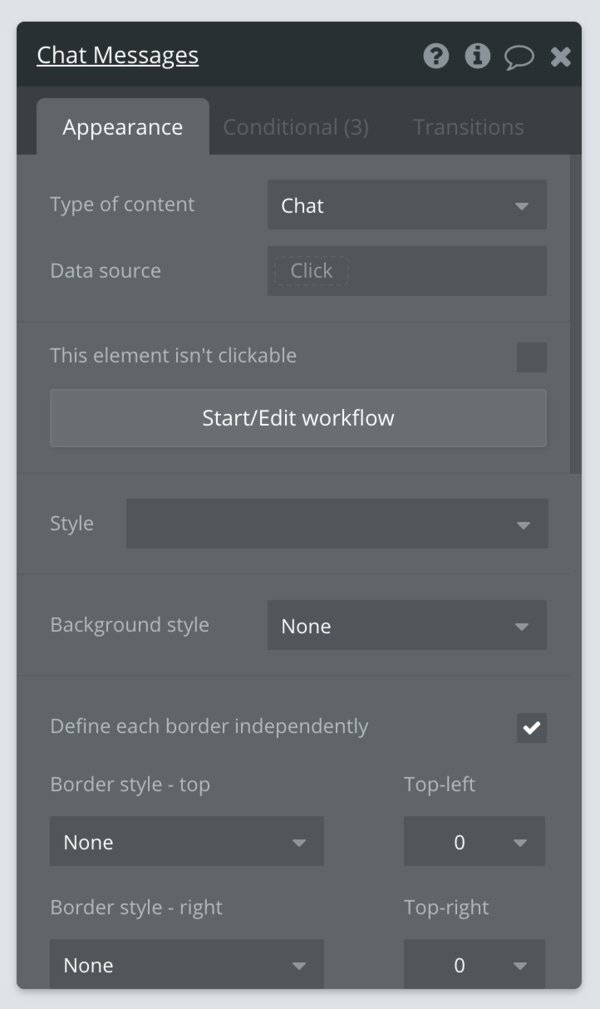
For the ‘Chat Messages’ group, you’ll need to set the data type to ‘Chat’. This means that this group will be referencing the ‘Chat’ data type that we created earlier in the database.
Each group should be scaled to fit the entire floating group from top to bottom, while the left group which will contain the list of chats should be narrower than the right group which will contain the messages. The width dimensions I used in the Reggit app were W: 190 for the left group and W: 345 for the right group.
At the top of the left group, add a text element with the label ‘Chat’.
Your chat should now look something like this:
At the top of the right group, we’ll add our first bit of dynamic data. This is an element that references data in our database. Since this is a chat, users would benefit from seeing the username of the person they are chatting with when the chat is active. So for this text element, we’ll create dynamic data that displays a username.
To do this, add a Text element to the top of the group. Within the editor, select ‘insert dynamic data’. This will enable us to reference data from the database. When inserting dynamic data, click the editor, and type out the name of the group that the text element is in. In this case, the group was labeled ‘Chat Messages’, so if I start to type that in, the option to select that group shows up, as illustrated below.
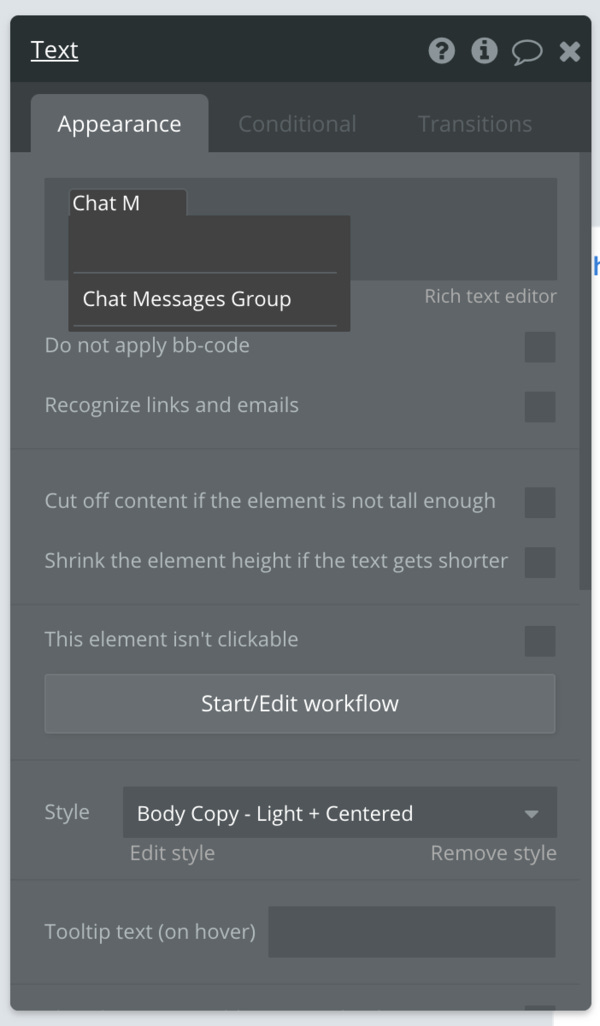
The next option that will show up is ‘Chat’. The reason for this is that earlier we’d set the type of content for the group to ‘Chat’. Therefore this text element will be referencing the chat of the Chat Messages group.
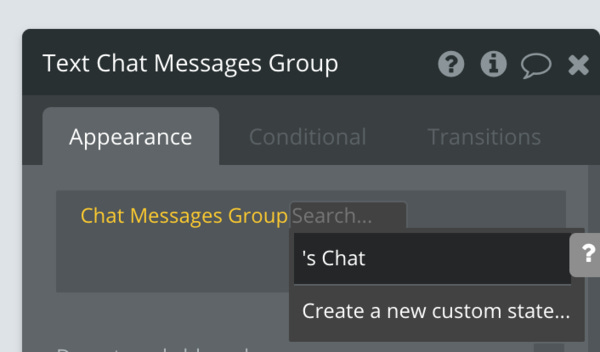
The next step will give a few more options to choose from. This is because the ‘Chat’ data type in our database has multiple fields, so any of these fields can be referenced here. In this case, we’ll link to the User field.

The next step is to select the ‘Username’ option. This will display the Usernames of the people active in a chat.
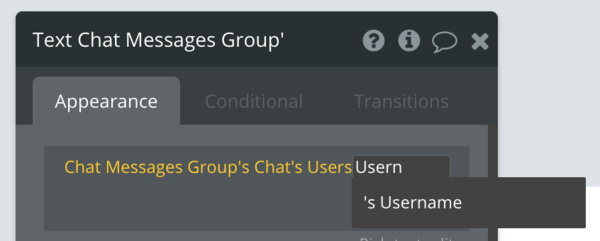
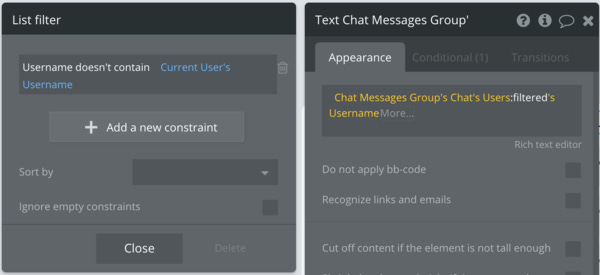
If you’ve completed all these steps, Bubble will register the dynamic data input as complete (meaning no ‘error’ warnings). However, the dynamic data up to this step will display a list of Users. This is because the data field we created for the Users is a ‘list’. However, the chat should only display one username - the username of the person that the current user is chatting with. To set the display to one username, we can add a ‘filter’ to the list. Within this filter, we’ll create this constraint:
Username doesn’t contain current user’s usernameBy doing this, we’re filtering between the usernames to only display the username that does not belong to the current user. This means the text will display the username of the person the current user is chatting with.
To further explain this, if a chat contains ‘User A’ and ‘User B’, when ‘User A’ is logged in, the name that User A will see displayed in the chat header will belong to ‘User B’, so User A will know that they are chatting with ‘User B’. Vice versa for when ‘User B’ is logged in.
The next step in building the messaging interface is adding the section in which the messages will be displayed.
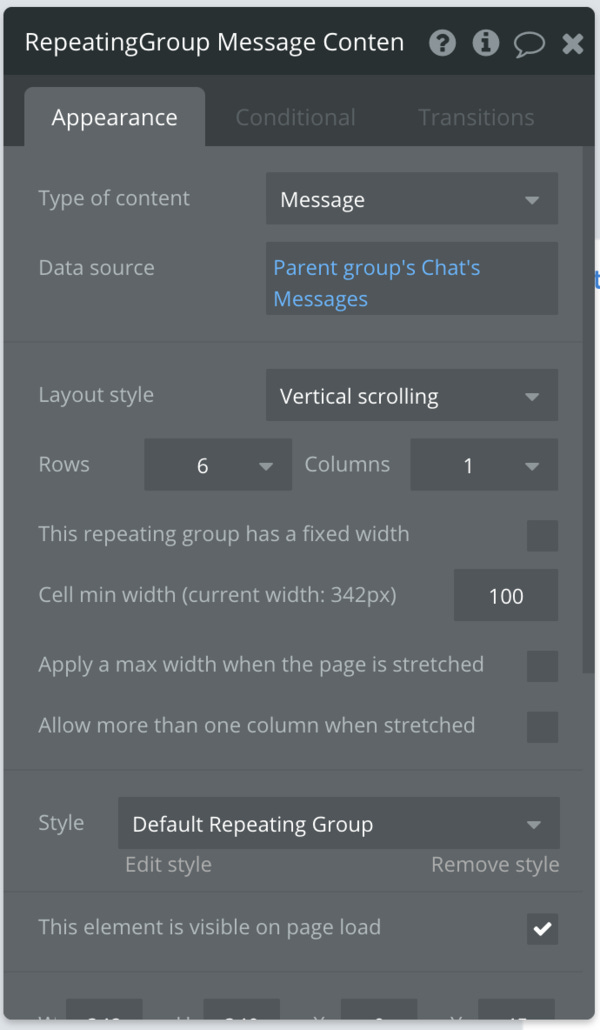
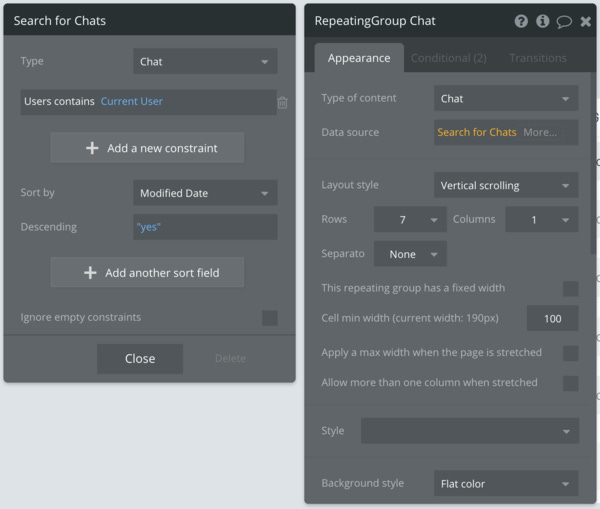
To do this, add a repeating group in the ‘Chat Messages’ group, and set the Type of content to ‘Messages’. The Data source of this group should be ‘Parent group Chat’s messages’. Set the layout type to ‘vertical scrolling’ and select the number of rows according to the spacing that you would like to have within your chat. In this example, the rows used are 6.
Within the repeating group, we’ll add 3 elements: An image element for the message sender, an image for the message receiver, and a text element for the message content.
The first image element should be placed on the right side of the repeating group. This image is a dynamic image, so it will be linked to the database similar to how we linked the Username earlier. The dynamic data should be set to display a user’s profile picture. Set the dynamic data as follows:
Current cell’s Message’s Creator’s User-Profile-Pic
What this means is that the image displayed will be the profile pic of the user who created the message that is displayed in the current cell. Once this is created, copy and paste the image element and place the copy on the opposite end of the repeating group. This copy will be used to display the current user’s profile picture. Label the image on the left ‘Recipient image’ and the image on the right ‘Current User image’ to help distinguish between the two.
If we were to leave the images as is, we’d notice a problem immediately in the live version of the chat - namely that each message would display the message creator’s profile pic on both sides of the repeating group. What we need is for the sender’s pic to display on one end, and the receiver’s pic to display on the other, depending on the sender of the message, as illustrated below:
To do this, we’ll need to add conditionals to the images. By adding conditionals, we can set an element to display in a certain way depending on whether the statement is true or not.
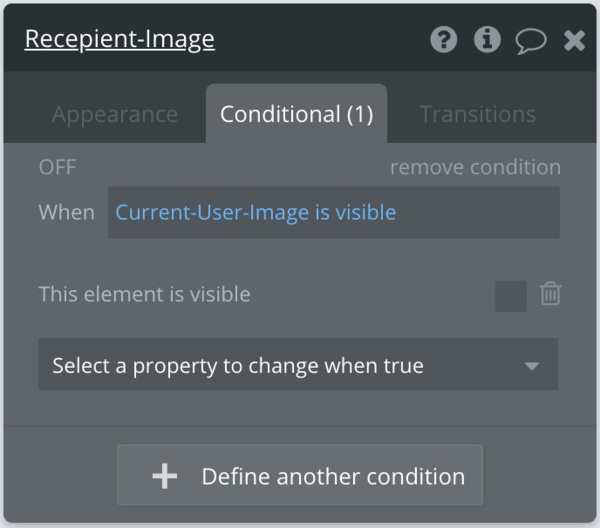
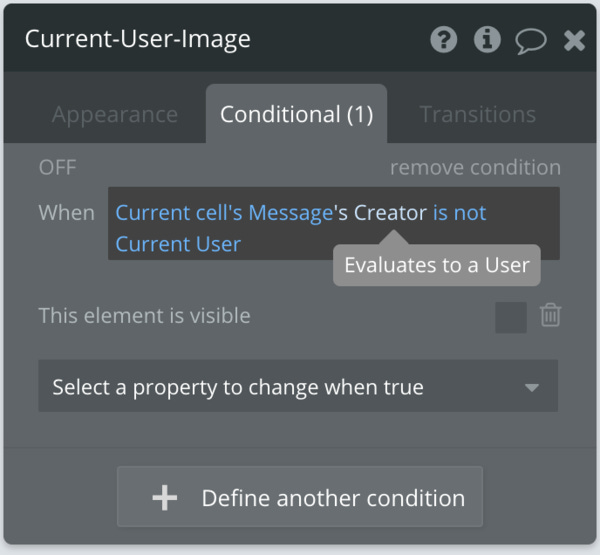
For the recepient image on the left side of the chat, open the conditional tab and select ‘define another condition’. Set the ‘When’ statement of the new condition to say when ‘Current User image is visible’ (Remember, ‘Current user image’ is the label given to the image on the right). Under the ‘select property to change when true’, select ‘this element is visible’, and make sure that the box is unchecked.
Here’s what this means: When the image on the right is visible (which is the image for the current user), the image on the left should not be visible.
If the image on the right isn’t visible, then the image on the left will display.
We’ll also add a condition to the image on the right. This conditional will state that when the creator of the message displayed in the current cell is not the current user, this image should not be visible.
This means that when the message displayed in the cell is by the currents user, the image on the right should display.
As a result of both these conditionals, the images displayed on the left will always display the recipient’s profile pic, and the images on the right will always display the current user profile pic. Whether the images are visible is determined by which user wrote the message on display in a given cell.
This is just one way to do this (in Bubble there are always multiple ways to get to a certain outcome). An alternative would be to set the image on the left to invisible by default, then create a condition that states that when the Current cell’s Message Creator is not the current user, this element is visible (meaning the checkbox is checked). Both formats should work.
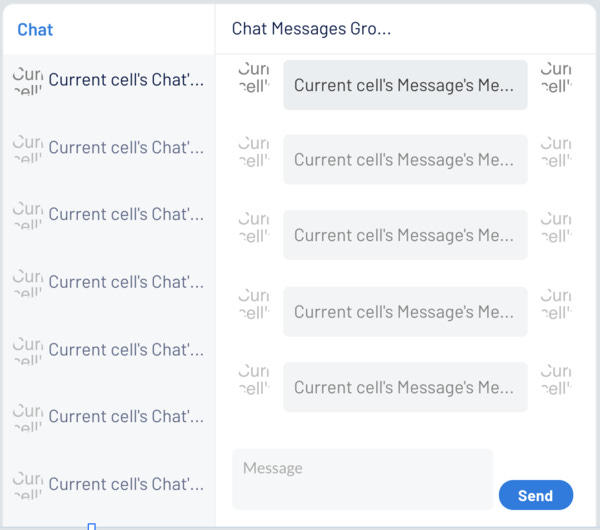
The final element to add in the repeating group is the text that will display the messages sent by each user. This is just a text element with a background added to it. To do this, add a text element to the repeating group, and style it with a light background color. Then set the dynamic data of the text:
Current cell’s Message’s Message Content.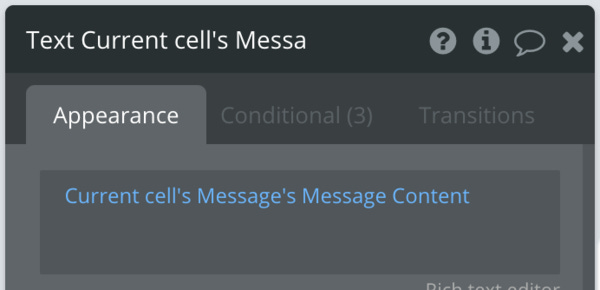
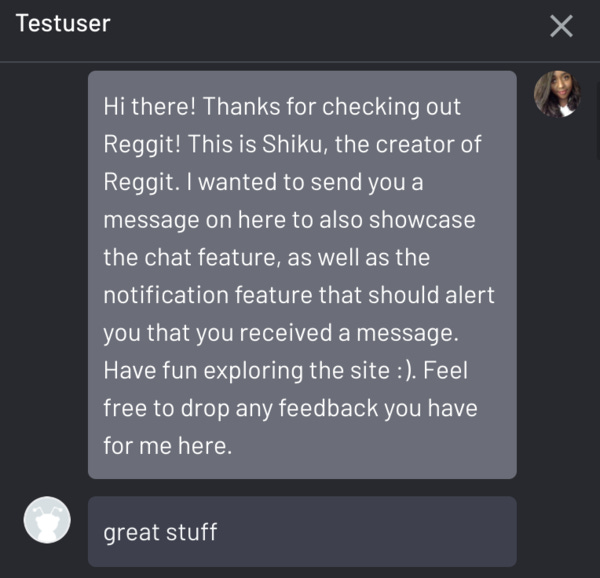
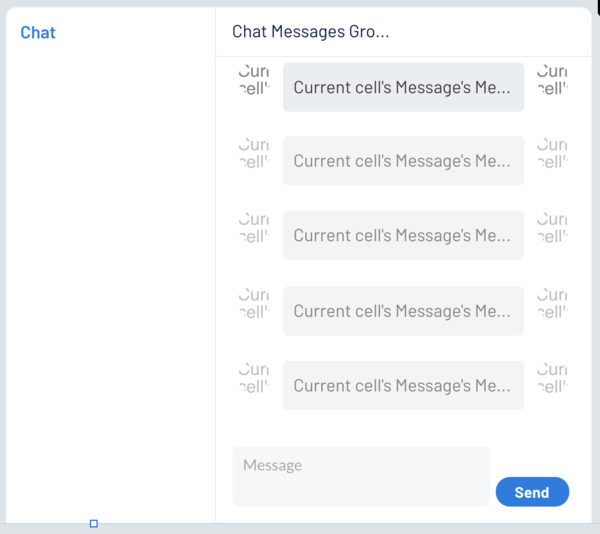
Your chat should now look something like this:

The final step is to add the input that will allow users to create messages. To do this, add a multi-line input below the repeating group with the placeholder text of your choice (in this example, I used ‘Message’). Next to the input, add a button element and label it ‘send’.
Your chat should now look something like this:
The last step to building the chat interface is to add the list of chats that a user is engaged in. To do this, add a repeating group in the ‘Chat List’ group on the left and set the content type to ‘Chat’. For the data source, set the dynamic data to a search for chats, with a constraint that the chat should contain the current user, and should be organized by modified date, as illustrated below:
Within the repeating group, we’ll show two elements: the profile picture of the user that’s being chatted with, and the username of the user that’s being chatted with.
To do this, add an image element, and set the dynamic data for the image to be the current cell’s chat users profile pic. The dynamic data will need to be filtered similar to how the username at the top of the chat was filtered earlier on. This will make sure that only one image is displayed - the profile picture of the user that is being chatted with, not the current user.

Next to the image, add a text element and format the dynamic data to be the receiving party’s username. This text element should be filtered in the same way.

Once you’ve completed these steps, your chat should now look like this:
That’s it for this issue. I hope you found this helpful!
In the next issue, I’ll cover how to create workflows that will enable the different elements to work. If you have any questions, feel free to send me an email and I’ll get back to you as soon as possible.
Also, in the spirit of building and learning in public, if you find any issues, errors, or inefficiencies in any of the processes shown, send me an email with a detailed explanation, and I will make note of the correction in the subsequent newsletter (and I’ll give full credit to you!)
Happy Bubbling!
Shiku